|
#211
 Sun 04 March 2012, 19:51
|
|||
|
|||
|
Losing steps
I had multiple problems with computer crashes after installing the 2010 screen set. I appear to have fixed the crashes by installing an archived version of Mach3 which seems to be more compatible with the screenset than the latest development version.
When I use Cut 3D to cut a 2 sided object, I set up a roughing pass and a finishing pass. The roughing pass seemed to work OK, but I could not get the finishing pass to actually touch the piece - it always seemed 10mm off. I ages working through the G-code and using calipers on the piece to see where the cutter should be, but could not find the coding error or failure in my zeroing logic. Then I had a brainwave. When the z moves down for the finishing cut, it has to further compress the gas shock that supports the z-axis. The gas shock was pushing back too hard, so the pinion was slipping on the rack. I tightened tension on the spring holding the stepper in place and hope I have corrected the problem. Another option would have been to raise the piece slightly. But the final solution will be to change the gas shock or extend the shock mountings so that the shock is not being compressed quite so much (Note: I have an extended Z-axis but used the standard mountings, even though the gas shock was ~30mm longer than specs because I could not get one that exactly matched specs) A benefit of knowing the machine inside out! 
|
|
#212
Tue 03 April 2012, 04:54
|
|||
|
|||
|
Extending the shock support
In the post above I mentioned how the machine was losing steps when the shock was compressed. While tightening the tension holding the pinion to the rack helped the situation, it did not solve the problem. The shock would resist too much for rapid Z moves near the table.
I decided to raise the top support of the shock above the top of the Z-axis. This does mean that I could lose that much travel at the top of Z. I resolved to only add as much as the length of the uncompressed shock. Some people will say that I should have done this in the beginning, rather than compressing the shock to fit in the "standard" laser part, and they're probably correct. Anyway, while looking for suitable material in the shed that I could use for a new bracket, I came across the pile of rail offcuts. Perfect. A bit of cutting, drilling and (poor) painting later I have an extended shock support that is somewhat stronger than necessary, but appears to have solved the problem. Apologies for blurry 'photo's. Can't keep my hand still. 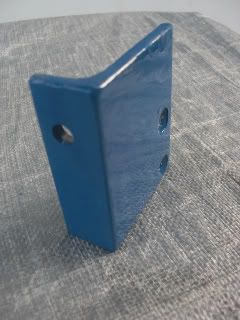 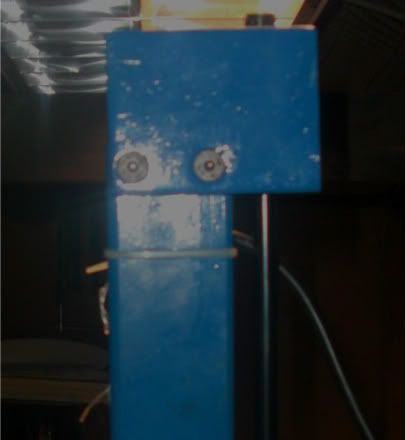
|
|
#213
Tue 03 April 2012, 05:05
|
|||
|
|||
|
Just so that the Americans can follow "shock" is short for shock absorber in Brit English, equivalent to "damper" in American English. Red is calling it a shock because it looks like damper.
|
|
#214
Tue 03 April 2012, 05:21
|
|||
|
|||
|
Hi Red
As long as you are able to get sufficient travel, that is, to compress the strut to allow the collect to hit the support board, you are good to go. If the pinion is still inclined to jump out of the rack then you might consider having the gas pressure reduced in the strut. By doing this you will make the final part of the compression easier for the machine to over come at the maximum stroke. As long as the strut holds the z axis "up" when turned it has sufficient pressure. The strut guys can calculate the pressures for you as to how many Kg at what pressure they will hold. Ross
|
|
#215
Tue 03 April 2012, 18:25
|
|||
|
|||
|
Gerald,
Thanks for the clarification. I half expected a comment on putting all that extra weight (200g) at the top of the z - something I wondered about, but decided to suck it and see. Ross, Good thinking. Yes the compression is not linear - it gets really hard towards the bottom of the stroke. This does not seem to affect things like zeroing to the table, but does come into play when running code. The problem arises because "standard" gas strut/damper sizes available to me were a touch too long for the 350mm z-axis. The best solution for future builders would be to determine what length gas struts/dampers are available and then cut the Z-axis support (longer) to suit. I have a relatively heavy router mounted, so I need a bit of stoof* in the damper. The system is pretty much balanced (the z rises gently when the motor is removed, but is neutral when the unpowered motor is in place). A modified strut will be the ticket when I move over to a spindle. * stoof is a South African technical term.
|
|
#216
Thu 31 May 2012, 23:51
|
|||
|
|||
|
I really dislike tracing computer crashes!
I've only got to run my machine on the odd occasion when work and family commitments allow (and it's not an unholy hour because the neighbors may not like the lullaby of cutter hitting wood and foam!).
I've had an ongoing problem with computer crashes and I thought I'd document some of the issues: In past weeks the Y-axis motor made a few clunking noises that worried me, but then everything seemed OK, so I shrugged and went on. The computer froze periodically, which was annoying, because I had to reset and restart from 1/2 way through the file. This week Y-motor refused to move, then it did, then it didn't. With computer crashes thrown into the mix, I was quite confused where to begin.
Yay! Must have been a wiring short somehow causing the computer to crash (with emphasis on the somehow, because BOB is optically isolated). No such luck. Computer froze in hour 13. Well at least I appear to have fixed one of the problems. Last night I pulled the computer apart, dusted it, threw away the unused sound card and graphics card and replaced the power supply. Now I'll try again. If crashes still happen, it could apparently be bad RAM, damaged motherboard or damaged HD BIOS (?). Other ideas? The computer only runs Cut3D and Mach 3, has a dedicated power supply and UPS and was stable for 5 years. Yes I know, get a new box. But the computer shop down the road says that new motherboards don't come with parallel ports and suggest I buy a parallel port emulator. Are they blowing smoke up my skirt?
|
|
#217
Fri 01 June 2012, 06:51
|
|||
|
|||
|
New motherboards often don't come with parallel ports, but they should come with PCI slots. You want a PCI slot parallel port. Not an emulator, not a USB parallel port - those don't work for realtime applications. Be wary of combo boards with multiple ports - they are often USB. Something like this (Make sure the type of PCI matches the motherboard in question)
|
|
#218
Fri 01 June 2012, 10:42
|
|||
|
|||
|
I have one of these motherboards and they come with a parallel port, and support Intel i3 and ddr3. That should be pretty good for Mach.
http://www.msi.com/product/mb/H61M-P23--B3-.html
|
|
#219
Fri 01 June 2012, 11:09
|
|||
|
|||
|
This Parallel card from Newegg
is reported to work fine with Mach3. I believe it is the same card as pmdx sells but for a lot less. Take a good look at the photos of the cards on both sites. 
|
|
#220
Fri 01 June 2012, 11:36
|
|||
|
|||
|
That Rosewill is a good card. Works good with Mach
|
|
#221
Sun 03 June 2012, 19:23
|
|||
|
|||
|
Thanks for the info. The MSI looks like a good option for motherboard.
PCI port extension not emulator, thanks, got it. There were a few negative reviews on the Rosewill, though The old box is reassembled with a new PSU and without any AGP or PCI cards or dust :-) Cut3D and Mach3 running OK and screen resolution and speed fine. In phase 1 of testing: Running a couple of large files offline. Then phase 2 of testing: Running large files with air cutting. Then I'll try a cut and if that works I'll (re)install the 2010 screenset and go back to phase 1.
|
|
#222
Sun 03 June 2012, 19:39
|
|||
|
|||
|
Red, that rosewill card is the same one that pmdx sells for their bobs. Have a look at the photos, negative reviews might also be someone with other issues.
|
|
#223
Sat 30 June 2012, 04:43
|
|||
|
|||
|
Clearance for Foam Blocks
Hi Red
Collisions are definitely an issue with the block method you are trying to get working. Have you considered profiling away the areas most likely to cause the collisions from the block before cutting the board itself. These clearance cuts are very easy to program, essentially just boxes of foam removed BEFORE cutting the shape out. A separate tool path to your board design toolpath would be the easiest way to go. Pic 1 Block Clearancing.jpg The clearanced areas still allow you to maintain centerline and nose or tail registration points for both sides. Conceptually a series of staggered boxes say 20 mm offset off the bottom and deck curves will remove most of the offending foam. This extreme example can be visualised below. Pic 2. Removing blocks offset to rocker .JPG Lastly and a lot harder for you this time. I checked out your video at post 202 and you have the large router base in place. This significantly reduces the plunge clearance for the bit, over just the router body fixed directly to the Z with the collet and bit in the free air. I'm sure you are aware of this but remounting the router and ditching the router base gives lots more clearance on curves. Pic 3 Base Vs Collet Nut and Cutter.jpg Run with it Red Regards Ross
|
|
#224
Sun 01 July 2012, 19:44
|
|||
|
|||
|
Hi Ross and Heath,
Thanks for the responses. I called the Australian distributor about the motherboards - seems that they don't stock the ones one the website. Was going to do a computer rebuild, but had one last crack at getting the old Intel 82801EB motherboard to run Mach3 and the 2010 screenset. I downgraded from Win 7 to XP (the BIOS changed to boot from the XP CD and the hard drive had to be formatted). It took quite a while to find all the drivers. Oh yes, Mach 3 requires extended graphics (it does not like integrated graphics), so I put the AGP card back in. I've installed Mach 3 and 2010 screenset and it seems stable. I've also put some pressure on the system via Prime95 and Memtest86. I'll hook the computer back to the machine later today and give it a run. Ross, those are good strategies for dealing with collisions, and you're right, the big router base does make a difference because (in 4WD parlance) it seriously affects the approach and departure angles and collides with excess foam around the periphery of the model. I spent a lot of time looking at workarounds. The best of these are:
I bit the bullet and bought a 6" long cutting tool. This should arrive later this week. I may have to lift my router to get the 12-13" of clearance I need from the table (at present the router hangs about 2" below the end of the Z plate). I'm also looking to upgrade to a spindle. This will get rid of many of the approach/departure angle issues. It's cold and rainy. This is motivating me to spend time on converting my cage trailer to a camp kitchen for a month in the sun at Point Plommer in December.
|
|
#225
Mon 02 July 2012, 02:02
|
|||
|
|||
|
Hi Red
A man with a welder and a CNC can make anything (well nearly!). Make sure your camp trailer has been touched by both. The hot wire sounds do able and way quicker than removing foam with the cutter. For general use these days the nose rocker is around that 100mm you are talking about. The overall rocker does not change that much from the old school 130 -140mm but completely removes the last minute kick up at the nose tip. Regards Ross
|
|
#226
Thu 19 July 2012, 21:54
|
|||
|
|||
|
New router installed
I bought a 6" cutting tool. Problem was that I could not clear the top of my 150mm high job, so I had to pull the slide off and rework the router installation. I changed from the cheap router I had been using to a Makita 3612. I took the opportunity to trim down the supporting bracket and strengthen the welds. It's been a while since I made sparks and steel shavings and I've really missed it.
Anyway, here's the router in place and the 6" bit squaring up a block of foam. The wires lead to the original router switch that I had to move when I took off the router's legs. One by-product of using the Makita is that it's so quiet. This is fantastic because it greatly extends the hours I can run the machine without alienating the neighbours. 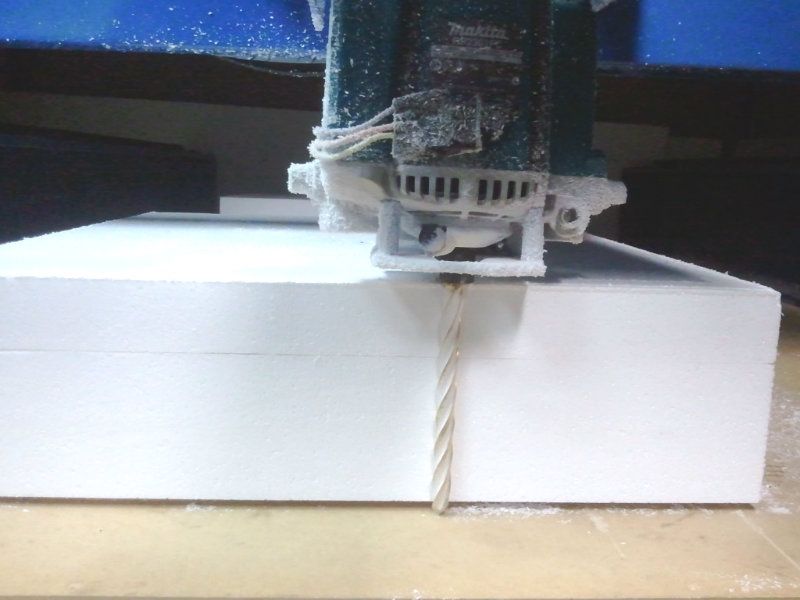
|
|
#227
Thu 19 July 2012, 23:37
|
|||
|
|||
|
Cutting EPS with the 1/2" FrogTools 6" cutter
After a few months working with 1/50 scale models and problematic computers I finally got to the point where I was able to take on a full size surfboard.
My approach is different to convention. In the normal way of cutting surfboards a close tolerance blank is used. It is held on movable supports and the cutting path calculated by specialized software based on the height of supports. Typically a single pass is made and the blank flipped and repositioned. The objective is to cut a board as quickly as possible (12 minutes a side). When I built the MechMate my intention was to cut boards from blocks of foam, using tabs to hold the shaped board in place. My thinking is that the block is easier to set up and flip, and I could use general purpose software, rather than specialized surfboard software. Here's a pic of my first effort after roughing the flipped side. 100mm/sec @ 9000rpm 40% stepover, 50mm pass depth 50mm/s plunge rate. 10mmx10mm tabs to hold board in place. Nothing is optimized yet, but these figures give good results. It took a few hours and multiple passes on both sides and I filled a wheely bin with foam dust. 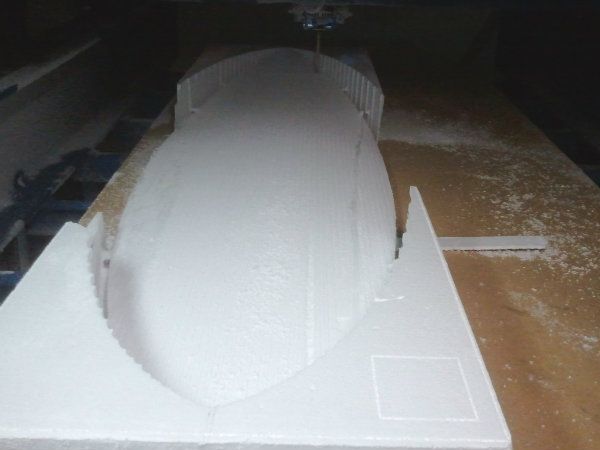 I did a 10% stepover finish on the other side and the end result was good (as good as one can expect when using throwaway insulation grade foam). Only problem was a gouge (right foreground) because I bumped an estop by mistake and did not reset properly before restarting. I also lost power to the router and was not quick enough stopping the machine, so two of the tabs got broken. I also noticed that when I use Mach3 to override feed rate over 130mm/s the motors started running a bit rough. Back off to 120% and motors went smooth.
|
|
#228
Fri 20 July 2012, 01:08
|
|||
|
|||
|
Awesome full size.
Always good to see a new method hit the streets. The new router setup looks the goods too. Well done on your methods proof of concept and it seems just a few little tweaks and the shapes are rolling off the machine. Not exactly sure but you might try increasing the overall speed of the motors in the motor tuning in Mach3 to get a bit more smooth motion out of the feedrate override. Regards Ross
|
|
#229
Fri 20 July 2012, 06:21
|
|||
|
|||
|
Red,
Remember to add a little snorkel to the intake of the router to keep the EPS from getting sucked in. I used cheese cloth and a snorkle on #5 when doing all that foam to keep the router from burning up. Yes, I actually sucked in enough EPS one week to flame out the Porter Cable router. Nicely done. If you want to experiment on saving money since you doing a 10% step over - grind a bullnose on the end of a 1/2" standard steel drill bit. The difference in cost is significant between frogtools and homemade.
|
|
#230
Sun 22 July 2012, 22:04
|
|||
|
|||
|
Thanks for the suggestions, Ross and Sean.
Ross, Do I recollect incorrectly that you had some problems when you pushed feedrate up in Mach3? Snorkel. Got it. Sean, Yes, the Frogtools are dear. It's an incentive to not crash into clamps! So I just grind the drillbit - I don't have to sharpen the bull nose? I saw a post of yours ages ago where you spoke of doing this, but I did not have the confidence to do it for myself.
|
|
#231
Sun 22 July 2012, 22:52
|
|||
|
|||
|
Red, you already built a functional MM, what is there to be afraid of to grind a drill bit?
|
|
#232
Sun 22 July 2012, 23:34
|
|||
|
|||
|
Hi Red
Your memory is intact. I resolved the issue by making the motor tuning faster so that the increased feed rate overide never approached the overall top end speed of the motors as per the motor tuning in Mach 3. Initially I thought my problem with the jerkyness was from my ESS install but in the end it was just how the motors were tuned and how fast I was attempting to run them (read Very fast). Sometimes to get into the range of the increased speed you might need the Mach3 kernel rate will need to come off the default 25k. As soon as the kernel speed is increased in Mach3 the motors will then be able to be tuned to a faster top speed (and everywhere in between of course). PS - that is one wide board you got there. Regards Ross
|
|
#233
Mon 23 July 2012, 05:29
|
|||
|
|||
|
Ross,
When you grind the rounded profile on the bit, the flute angle is then sharpened just like a normal bit. Meaning, yes - on a bench grinder I put the back relief on the leading edge and sharpened. It really only takes about 5-10 minutes once you have practiced. I found that a belt sander clamped upside down to the bench with 50-80 grit did the trick quickly. Make sure to quench the bit and not to overheat the edge....take your time. If I get a chance when I get back from Holiday - I'll do a little tutorial on it. Sean
|
|
#234
Mon 23 July 2012, 22:02
|
|||
|
|||
|
Quote:
Practice. OK I'll look up how to sharpen drill bits without benefit of my wondrous Drill Doctor.. A tutorial would be a valuable resource, thanks.
|
|
#235
Sun 05 August 2012, 20:14
|
|||
|
|||
|
XPS shavings jam Z-slide
I've cut a fair bit of 1lb EPS without problems. I moved onto XPS which comes in at 3lb or so (40kg/m3). I like XPS because it does not attract water the way EPS does.
XPS shaves nicely into spirals like soft wood. Unfortunately half way through a board the machine lost steps. I went into Feedhold and determined that the Z-axis was jammed. After Stopping I found that the XPS had got between the V-rollers and Z-plate and compressed so hard that it jammed movement. Installing brushes for Z-slide.
|
|
#236
Fri 10 August 2012, 05:48
|
|||
|
|||
|
Hi Red
Nasty stuff in the machinery, but great foam. Just a thought, how about as an experiment set up a plain old 3 speed fan. Something like the $15 cheapies at Bunnings and blast air at full speed down into the throat of the Y car where the Z slide is located. The object here is to just blast away everything before it gets up into the Z slide V wheels are well as into the router intake. The foam is light so I expect the (big) fan would well and truly keep the small bits away. If it works OK then a tidier implementation of the rough concept might be worth investigating. The issue here is this just moves the foam somewhere else. As long as it is not in the mechanical parts then it just extends the sweeping time at the end of the job a little. My compressed air blower for the Y rack and pinion worked really well. A big difference was virtually none of the foam went to my Z slide rollers. I suspect that had to do with how the dust extractor drew a stream of air over the Z. Still a total mess of foam though and definitely not a 100% solution as I still blew the machine down after each board. Regards Ross
|
|
#237
Mon 13 August 2012, 23:48
|
|||
|
|||
|
Red - here is a guy doing ok with the block foam method.
Maybe copy his big holding tabs as they will easily sand off quickly when doing the finish shaping. http://www.youtube.com/watch?v=9nDkXfxmXEg He seems to even like the foam dust, it is everywhere incl. stuck to the monitor screen. Foam Block SUP.jpg Ross
|
|
#238
Tue 14 August 2012, 04:26
|
|||
|
|||
|
That's a big paddle board!
|
|
#239
Tue 14 August 2012, 06:00
|
|||
|
|||
|
Ross,
The big fan and catch net is very useful. I wish I had pictures from the big foam sessions I cut. I stapled theatrical sharktooth scrim in the garage door opening 10' x 20' and used 2 large fans on the other end. I was able to blow almost all, plus the regular vac pickup on the z into the net. It kept the area pretty clear. Snow shovel used at night for clean up.
|
|
#240
Wed 15 August 2012, 18:30
|
|||
|
|||
|
..and here I am standing by with a shop vaccuum cleaner, manually sucking up foam as it accumulates. It works, but it does take up a bit of time. On the plus side, I'm around if something goes wrong.
|
 |
|
|
 Similar Threads
|
||||
| Thread | Thread Starter | Forum | Replies | Last Post |
| Making Skins #74 - Brisbane Australia | Surfcnc | MechMates already cutting | 1078 | Sun 20 September 2015 11:05 |
| A chip off the old block | quadtech | Miscellaneous / General / Whatever / Catchall | 0 | Tue 23 August 2011 07:30 |
| Anyone need more bearings? MELBOURNE | rotorzoomer | The Market Place | 1 | Fri 12 February 2010 06:45 |
| M1 18 000 Alternative Stopper Block | dmoore | 20. Gantry | 15 | Fri 13 June 2008 12:47 |
| Rail and Block | John | Archives | 2 | Mon 09 April 2007 15:25 |


