|
#421
 Sat 08 March 2014, 12:48
|
|||
|
|||
|
Didn't even catch that Pete. Wow it has finally happened, way too long in the making. When does your build time start? Is it from the time you actually start building or from the time you download plans? If its from actual build I started 14 months ago, if you start from plans, well that was April 2009 (when my son just turned 11, turning 16 this week). Hows that for length of build? It wouldn't be a record but damned close.
If I remember right it took some time for some recent serial numbers to be given. People must be busy, weekend stuff you know. 
|
|
#422
Sat 08 March 2014, 19:08
|
|||
|
|||
|
Sorry Didn't get any more pics today, try again tomorrow. Can someone explain how to post actual pictures on here. I've only been able to do it once (I think by accident). Thanks

|
|
#423
Sat 08 March 2014, 20:43
|
|||
|
|||
|
If you upload to Flickr, first make sure the picture is publicly viewable.
1) click on your picture on your Flickr photostream to view it only 2) click on the 'box with an arrow' for more ways to share 3) click on 'Grab the HTML/BBCode' and set the radio button to BBCode 4) select your size from the combo box and right click over the provided code in the memobox and choose copy (or use Ctrl + C) 5) on your thread here click on 'Post Reply' (I use this so I can use the preview message option to edit anything I want). In this window either right click and paste or use Ctrl + V to paste the code from Flickr in the post box (you do not have to click on the image item on the toolbar) then click on 'Preview Post'. You can edit out url tags you do not want to include if you wish as long as they are not linked to the picture url. When you are done choose 'Submit Reply'. Last edited by pblackburn; Sat 08 March 2014 at 20:52.. Reason: Wrong wording
|
|
#424
Sat 08 March 2014, 20:57
|
|||
|
|||
|
To upload a picture that will be housed here
1) click on 'Post Reply' on the thread your in. 2) click on Manage Attachments button in Additional Options section below the Submit Reply and Preview Post buttons 3) the popup window will show your the requirements for the picture size. Click on Browse to locate the picture file 4) Click on 'Upload'. If the file is not excepted it will tell you. Assuming it is ok choose 'Close this Window' at the bottom and you can see there is an attachment now to that message 5) Click Preview Post to see it and Submit Reply when you are done with the message
|
|
#425
Sun 09 March 2014, 05:17
|
|||
|
|||
 Something like this Pete? I need to right this down to have handy. Thanks again! Hey can you do this with video as well? Last edited by Tom Ayres; Sun 09 March 2014 at 05:22..
|
|
#426
Sun 09 March 2014, 08:29
|
|||
|
|||
|
Print his picture posting directions above and stick it next to your monitor.
I want to see lots of pictures of your creations, and I'm sure others do too. Very tidy wiring job, Sir.
|
|
#427
Sun 09 March 2014, 08:48
|
|||
|
|||
|
I see it so you did it right. Posting a video link is the only thing I know you are allowed to do here. Some forums allow you to embed the video so you can play it in the forum but not here as of yet. The best you can do with video is to use the same format for the picture to be displayed with a YouTube video image link. I have not been able to find the link to a video image with Flickr yet.
See the attachment
|
|
#428
Thu 13 March 2014, 03:34
|
|||
|
|||
|
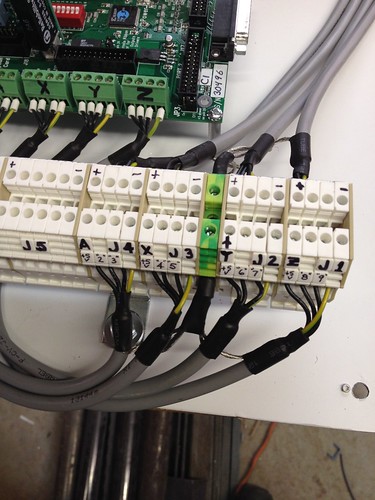
Here's some pics while building
[IMG]  Tagging the Wiring to help keep it straight [/IMG] 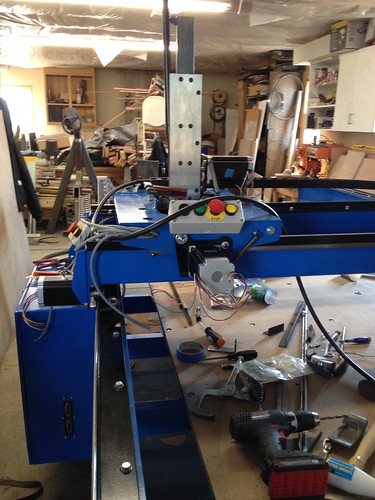 IMG_0159 by ThomasAyresJr, on Flickr 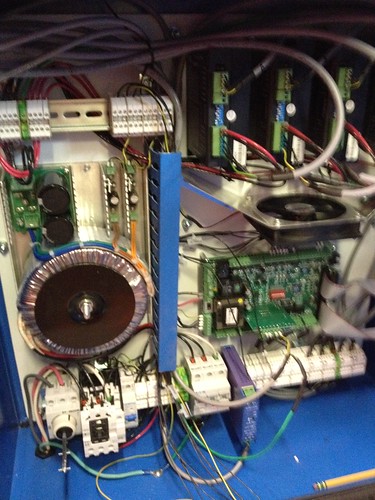 IMG_0185 by ThomasAyresJr, on Flickr 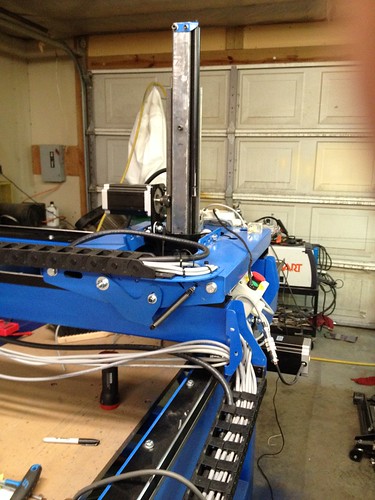 IMG_0183 by ThomasAyresJr, on Flickr 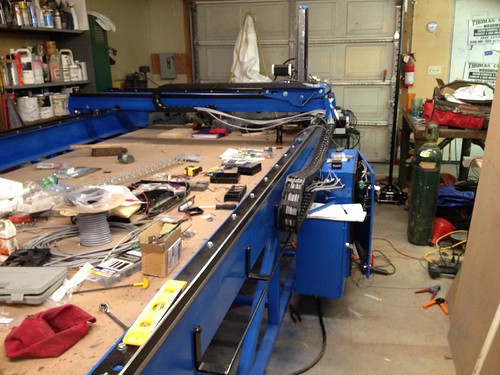 IMG_0184 by ThomasAyresJr, on Flickr That's all I can give you until later. Please excuse the mess, but better to share than keep to myself.
|
|
#429
Thu 13 March 2014, 04:09
|
|||
|
|||
|
nice...
your X chain seems to be sagging a lot... (second hand ?). Watch out for binding issues...
|
|
#430
Thu 13 March 2014, 04:28
|
|||
|
|||
|
New IGUS, really long, a lot of shielded wire. Its the type with the access on the outside of the bend, if I had to do it over again (I still may) I'd get the type with the access on the inside or no access at all. Also,the access slot makes the chain rest funny on the support rod causing it to push outward too. I'll have to weld an additional bar to the outside of the existing rod to straighten it out. I was going to put a landing ramp out of hdpe or something on top of the control box for the chain to slide on (as an option) and give it support. Any suggestions? Dump it, get a new one?
|
|
#431
Thu 13 March 2014, 06:09
|
|||
|
|||
|
For the cables going to the gantry chainflex, I bought some 3" mending angles, and screwed on of those 3" wide plastic split wire chases used to hide TV wires on the wall.
Cheap and works great. I can snap a pic later, if you'd like.
|
|
#432
Thu 13 March 2014, 07:50
|
|||
|
|||
|
I've got a piece of punched aluminum broke in a channel (not in any of the pics), thanks. Still wondering if I'll get a serial number, do I need to do something else like stand on my head and spit nickels?
Last edited by Tom Ayres; Thu 13 March 2014 at 07:53..
|
|
#433
Thu 13 March 2014, 10:51
|
|||
|
|||
|
A small bit of round pipe works well too....set it on centerline of chain. Chain will be supported, glides well, doesn't collect dust.
Just like the chain support you have now.....just a little bit higher in elevation to support the chain, but not interfere with carriage.
|
|
#434
Thu 13 March 2014, 10:57
|
|||
|
|||
|
For Serial numbers you need Blue, Labels and something you have cut!

|
|
#435
Thu 13 March 2014, 11:01
|
|||
|
|||
|
Good idea Sean. Might have a piece or two around.
I'm onto the Machine Hold buttons, I understand that a "brain" is needed, this is way beyond me at this time, I'll have to do some research, does anyone have suggestions where to find this info using a stop and separate start button? Sorry but this I must lean on others for help. All info is greatly appreciated folks.
|
|
#436
Thu 13 March 2014, 11:03
|
|||
|
|||
|
Heath, been there, done that, got the t-shirt

|
|
#437
Thu 13 March 2014, 11:09
|
|||
|
|||
|
Sorry Tom,
I just could not find pics of your logos on the machine or something you cut Your looking pretty good though!
|
|
#438
Thu 13 March 2014, 12:32
|
|||
|
|||
|
Sorry Heath I'm really bad with the picture thing, Pete has been kind enough to tell me how. However you can find my video on post 402. There you can see it running and logo on the gantry. Thanks Heath.
|
|
#439
Thu 13 March 2014, 13:03
|
|||
|
|||
|
Video linked in post 402 shows cutting and logos.
Edit: Missed Toms posting above when I replied on my smartphone. Last edited by darren salyer; Thu 13 March 2014 at 13:18..
|
|
#440
Thu 13 March 2014, 13:05
|
|||
|
|||
|
Good Grief, I missed that one!
Geez you need a Serial Number! Mike get this man a serial number!
|
|
#441
Thu 13 March 2014, 18:12
|
|||
|
|||
|
Just had a thought...when I connected my spindle to the vfd, the cable I purchased has 4 wires of which only 3 are needed and the 4th could be used as a ground or something. If I connect it to the spindle and ground it back at the vfd control box, would that create a ground loop or is that safe to use for the zeroing ground?
|
|
#442
Thu 13 March 2014, 18:31
|
|||
|
|||
|
Congrats on your build !!! You get #117 !! Been busy at work and cant do these updates on my IPAD
!!!
|
|
#443
Thu 13 March 2014, 18:36
|
|||
|
|||
|
Congratulations
|
|
#444
Thu 13 March 2014, 18:45
|
|||
|
|||
|
There is a potential yes, but the ground carries the unbalanced load in the straightest path back to ground along the cable supplying the motor. It also allows the shielding to capture the noise. Some have isolated the motor mount from the Z slide. Chinese spindles do have a voltage drop on the case of the motor so it is a good idea for the ground. I did not isolate mine and I have my debounce set at 200.
Quote:
|
|
#445
Thu 13 March 2014, 18:53
|
|||
|
|||
|
Wow Tom, missed updating myself with your thread, congrats on #117! I like the care and attention you have paid to your build, your machine should give you great service for years to come. Eagerly awaiting the dusty pics and the cool things you'll produce
|
|
#446
Thu 13 March 2014, 18:58
|
|||
|
|||
|
Congrats Tom. Looking forward to see how you make use of it.
|
|
#447
Thu 13 March 2014, 19:08
|
|||
|
|||
|
Thanks again Pete. I figure that the spindle would not be running at the time of setting the zero, so there'd be minimal noise if any and I can make use of that wire.
Finally official, #117. Yahoo Thanks for pushing me along Pete, Darren, Sean and of coarse Big thanks to Gerald for making his knowledge available on the forum and supporting it, and Mike for keeping it going. I'm having a moment...lol
|
|
#448
Thu 13 March 2014, 19:32
|
|||
|
|||
|
On to improvements...I ordered an e chain for the z yesterday and 2 15' parallel cables, the others are too short, I'm trying mount the spindle water pump, radiator and fan right beside the z on top of the y car and run the hose through the chain, the power is supplied by the 12 vdc PS tap (I haven't figured out how to turn on/off yet, but will...other than physical switching). Once I get the z proxy mounted I'll start on the dust shoe thing...But first thing first. Zero plates and proxy set-up. Meanwhile playing around with Aspire...and on...and on...
|
|
#449
Thu 13 March 2014, 19:42
|
|||
|
|||
|
Missed the congrats, thanks Mike, Bruce and DB. Looking forward to pumping out some stuff.
|
|
#450
Thu 13 March 2014, 20:25
|
|||
|
|||
|
...big congrats and enjoy the machine.
|
 |
|
|
 Similar Threads
|
||||
| Thread | Thread Starter | Forum | Replies | Last Post |
| Cutting sign vinyl with your MM | smreish | Cutting various materials - bit selection, feeds, speeds | 5 | Thu 17 March 2016 03:33 |
| Problems working the end of some Ballscrews | coinhunter | Miscellaneous / General / Whatever / Catchall | 5 | Thu 21 July 2011 14:06 |
| Working Out The Table Plan | dakmonf | Introduce yourself and start planning | 32 | Wed 30 June 2010 11:59 |
| Power Contactor Not Working | Regnar | Troubleshooting | 28 | Sat 10 April 2010 12:38 |
| Vinyl Cutting with MM - Drag knife attachment for router | Kobus_Joubert | 50. Toolheads | 17 | Thu 04 June 2009 01:27 |


