|
#451
 Sat 26 October 2013, 04:48
|
|||
|
|||
|
Pete,
I like that a lot. Good job. 
|
|
#452
Sat 26 October 2013, 05:11
|
|||
|
|||
|
That is Cool!
|
|
#453
Sat 26 October 2013, 16:11
|
|||
|
|||
|
Here it is, Happy Halloween.
|
|
#454
Sun 27 October 2013, 18:38
|
|||
|
|||
|
|
|
#455
Sun 03 November 2013, 07:26
|
|||
|
|||
|
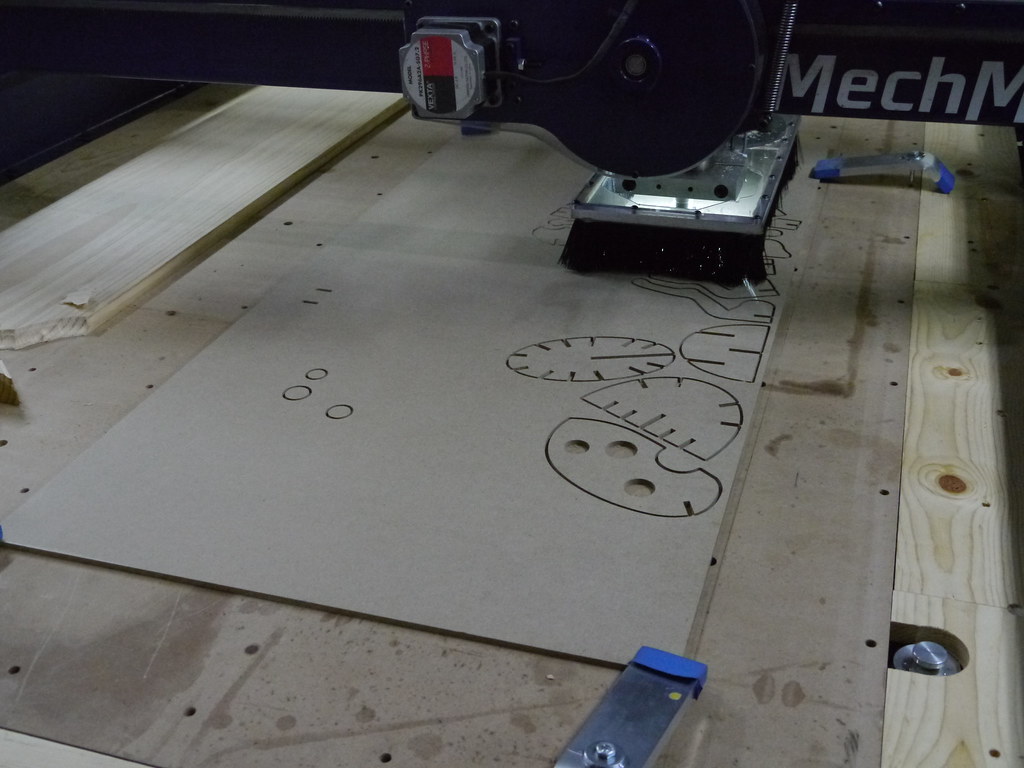
Finally at a stopping point with my shed building project. Not finished, just out of money until spring. Figured I would fire up the machine that has been sitting since July. Reduced and flattened one of the 3d clips I posted and cut it out. I see some things I would like to change.
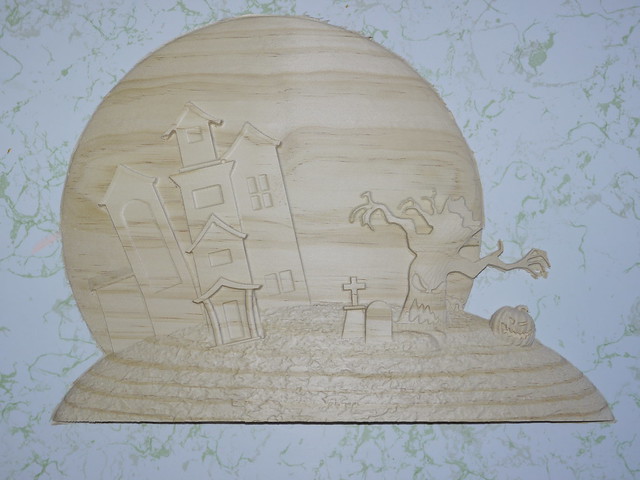 Halloween, on Flickr
|
|
#456
Sun 03 November 2013, 07:37
|
|||
|
|||
|
Looks nice after all !!
 I like what the wood grain gives as a final output ! It this....ash ? May you tell us what was your toolpath strategy ?
|
|
#457
Sun 03 November 2013, 08:06
|
|||
|
|||
|
The wood is premium stain grade pine. This was right off the machine. The size of it is roughly 14 (356mm) x 10 (254mm). I added 4 2.5D wedges to use as holding tabs. Just used vectors to control the areas I wished to finish. I always use a roughing with a large bit then finish with a Beckwith Taper Ballnose 0.125". In this case, some areas needed the 0.0625" tool as well for bringing it the detail. I typical use raster instead of offset machining.
Last edited by pblackburn; Sun 03 November 2013 at 08:19..
|
|
#458
Mon 04 November 2013, 17:51
|
|||
|
|||
 Updated Halloween , on Flickr Changed some stuff. Limbs were a weak point. Clouds were used to help this. Modified the tree to make more realistic. Texture on the moon was not exposed enough so I added some more. Fits more with the theme.
|
|
#459
Mon 04 November 2013, 18:01
|
|||
|
|||
|
|
|
#460
Mon 04 November 2013, 19:10
|
|||
|
|||
|
Pete....Pine hein, nice too !!....Its not as easy from a photo to be accurate !!
Thks for the toolpath info, but actually, I was hopping youd share the cutting info ( tool info) such as...cutting parameters, feed & speed infos Tks, Robert
|
|
#461
Mon 04 November 2013, 19:21
|
|||
|
|||
|
I use the the chiploads info provided from Beckwith to calculate and set my speeds. I use a conservative speed of 100 ipm with the 0.125 bit with a 0.01 step over. I run the 0.062 bit at 80 ipm with 0.005" step over if I have to use it. My roughing is a round nose with a 0.04" clearance. I get the Beckwith bit with the ZRN Coating here. http://www.beckwithdecor.com/index_files/Cutters.htm Hope that helps. Not a quick cutout but all good things take time.
|
|
#462
Tue 05 November 2013, 01:56
|
|||
|
|||
|
Thks for sharing Pete....its always interesting to see others toolpath cutting strategy !
Although the photo couldnt give justice of the actual final output as holding it, your seems nicely finished ! Robert
|
|
#463
Sun 10 November 2013, 10:23
|
|||
|
|||
|
3D Puzzles
|
|
#464
Mon 11 November 2013, 17:06
|
|||
|
|||
|
Pricey
I checked the prices on the bits. They are expensive. They are $176 for the set of three. Be nice to find another source.
|
|
#465
Mon 11 November 2013, 17:15
|
|||
|
|||
|
Cost is only relevant if you get the same performance with a less expensive bit. I can say these are a strong bit and stay sharp. I have several different bits over $50 a piece. Most of the time I can say you can run faster and longer with a quality bit. I would stay Beckwith bits rank with the best of them. I was skeptical myself but after reading a lot of forums and the people talking about their performance I gave them a try. I am glad I did. I do not run production like a lot of the guys here but if I did I would change to insert style bits. For now I just use solid carbide (coated when available).
|
|
#466
Mon 11 November 2013, 17:30
|
|||
|
|||
|
I use ebay carbidechiu and dobest2012 endmills and ballnose exclusively because of price and comparable longevity for 5-6$ on 6mm endmill you cant go wrong if you try
|
|
#467
Mon 11 November 2013, 17:31
|
|||
|
|||
|
I will check that out.
|
|
#468
Mon 11 November 2013, 17:33
|
|||
|
|||
|
Hurshy, Amana makes some with the same coating. Another is Vortex tool company part#'s 2205, 2215, 2245 & 2260 http://www.vortextool.com/index.cfm?...ategory_id=136 Not sure about pricing yet. The prices listed are retail, you can get them from your local bit sharpening service/supplier cheaper. The Amana brand is much cheaper than Vortex.
Last edited by Tom Ayres; Mon 11 November 2013 at 17:35..
|
|
#469
Mon 11 November 2013, 17:35
|
|||
|
|||
|
Amana is a descent bit. They braze the carbide on the steel to reduce the costs. I have one of there 0.005" engraving bits.
|
|
#470
Tue 12 November 2013, 14:12
|
|||
|
|||
|
wow nice info you have here.
what do you think on CMT orange. i have only the chance to use that brand. i got them from routerbitworld. do i have to trie onsrud amana or other brand?
|
|
#471
Tue 12 November 2013, 15:25
|
|||
|
|||
|
I have several sets of CMT router bit sets. CMT is Italian company, they are know by the orange color. They are known world wide as a leader in their field. Just ask them. I do just for fun every time I go to the trade show. I also like Jesada, they are here in the Tampa area. they were sued by cmt because they painted their bits orange. Frued is also .
|
|
#472
Tue 12 November 2013, 15:58
|
|||
|
|||
|
You use what works best for you. I have not tried those yet.
I have had the best luck with carbide bits. But steel bits I have read work better with certain types of plastics. Always try a different bit. You may find it lasts longer than the one you currently are using. But the biggest thing I found is using it within its design specs. Not all carbide manufacturers are the same just as not all carbide grades are the same. A surfacing insert cutter for example Amana RC-2257 will run you around $250. But the inserts are only $4 a piece. If you are doing high production, the cost is trivial in the long run. I work for a big name carbide manufacturer so I am a little bias when it comes to carbide vs steel. Is price a determining factor? I think only if all the variables are taken into account.
|
|
#473
Tue 12 November 2013, 18:40
|
|||
|
|||
|
CMT is in Greensboro NC, and the owners of Jesada used to be partners with CMT. For a while the bits were perfectly identical including the color (hence the suit) now Jesada is white. The customer service of CMT is great. I actually met those guys while they were splitting with Jesada, They gave me hats & T's for my whole crew and samples of new bits.
 The quality of most of their stuff is real good, especially their melamine blades and dado sets (I have one from each of them). The quality of most of their stuff is real good, especially their melamine blades and dado sets (I have one from each of them). Pete I too have a few insert bits and wouldn't trade them for anything. Need a quick sharpening? turn the cutter or flip, beautiful ain't it?
|
|
#474
Tue 12 November 2013, 19:38
|
|||
|
|||
|
Yes it is
|
|
#475
Wed 13 November 2013, 17:53
|
|||
|
|||
|
I found this a while ago about turning the toolpath preview off at startup. Here is what I found on machsupport forum. Worked like a charm.
|
|
#476
Wed 13 November 2013, 18:03
|
|||
|
|||
|
Had to resurface the table today for the first time since it started cutting. Was slight variations in the surface that I can only contribute to moisture absorption. What a difference the water cooled spindle made. Originally I used a PC7518 router. The fan on the router overpowered the dust shoe and dust was everywhere. The water cooled experience is much more desirable with surfacing the whole table with the only dust escaping is the little build up in the shoe bristles. No having to vacuum the the machine and floor around it. It is a thing of wonder.
|
|
#477
Wed 13 November 2013, 21:36
|
|||
|
|||
|
When I get the funds I hope for a similar water cooled experience.

|
|
#478
Thu 14 November 2013, 15:39
|
|||
|
|||
|
I'll second Als comment.
|
|
#479
Thu 14 November 2013, 16:51
|
|||
|
|||
|
I haven't got mine up and running yet but have run tests and love it so far.
|
|
#480
Tue 19 November 2013, 18:28
|
|||
|
|||
|
I had to adjust my Z zero proble after surfacing the table. I realized how barbaric the setup was. I used a straight edge and loosened the bolts that hold it on. Then I had to tap it into place. Tap it until the gap is the same between the Y+ and Y- of the plate. I need enough tension to adjust it but not so loose it would free fall in the slots. I thought to myself "...a hammer and wrench, this is just stupid...". So I was off to improve upon the design.
The probe is set perfectly flat along the X axis. The problem is when I have to move it up or down, the Y axis direction of the probe plate would be canted and need adjusted. If the tool that is touching off is larger, the Z zero would not be zero but instead 0.01" proud. This is what I came up with. I machined two pieces of angle that would attach to the mounting plate. Once it is attached, there is a fine threaded set screw that is through a slotted hole in the bottom of the angle. I used Loctite 242 thread locking fluid on two jam nuts to allow the set screw to drive the mounting plate up or down as needed. The nuts are not tight to the angle. They are loose enough to allow the set screw to turn and act as a jack bolt. The cross-bearer is drilled and tapped. Now I can use the straight edge and slowly turn up the mounting plate until the probe activates then back off slightly then lock down the mounting hex bolts. This allows the mounting bolts to remain snug and the whole process is much easier to set the Z-zero digital probe to table Zero. The first trial rendered a 0.002" differential between the probe plate and spoilboard surfaces. The test was performed by running the touch off Z zero sequence then applying spray paint to the spoilboard. I ran the cutter down to 0.020" off the spoilboard then jogged down by 0.001" until the paint was cut by the tool. The reading was a -0.002" 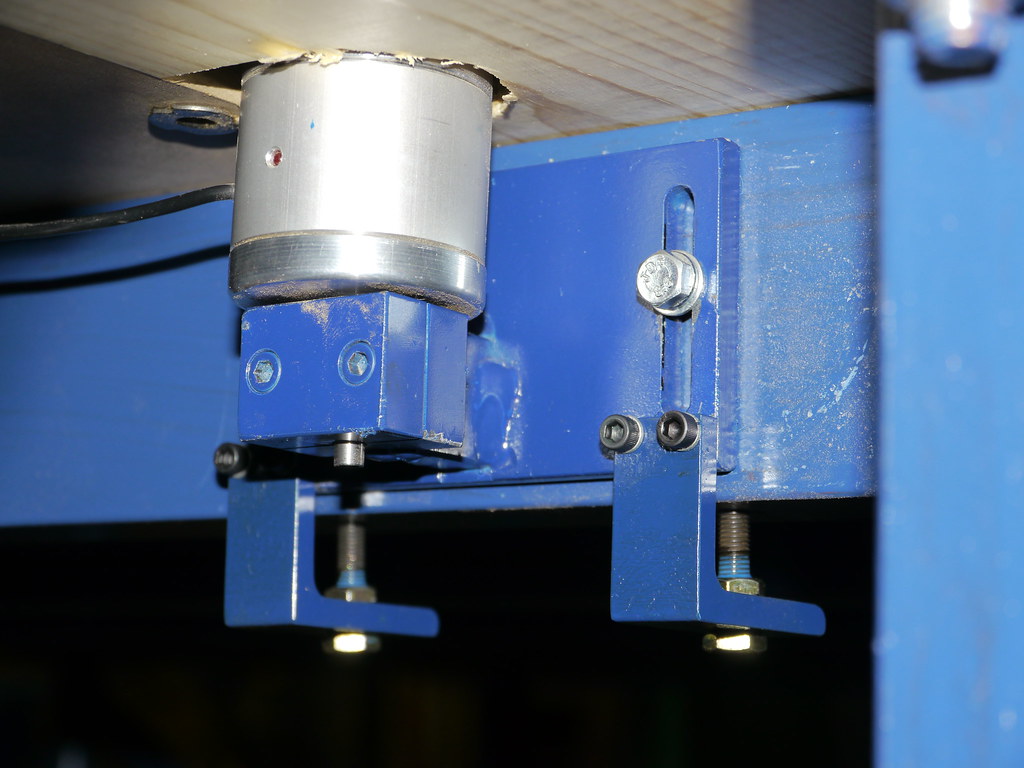 View 1  View 2 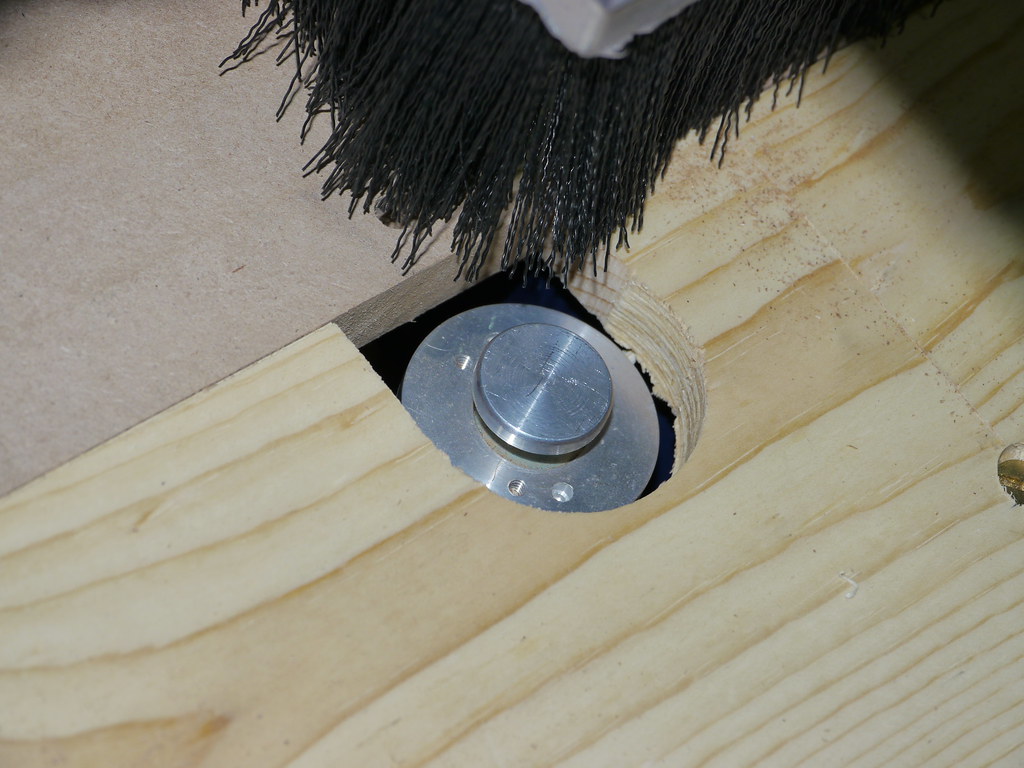 Top View
|
 |
| Register | Options | Profile | Last 1 | 3 | 7 Days | Search | Today's Posts | Mark Forums Read |
| Thread Tools | |
|
|
 Similar Threads
|
||||
| Thread | Thread Starter | Forum | Replies | Last Post |
| Parts arrived !!! Time to get to work !! - Pennsylvania USA | Rapid | Introduce yourself and start planning | 51 | Fri 06 June 2014 07:53 |
| Newbe here - Pennsylvania, USA | Dave | Introduce yourself and start planning | 19 | Wed 11 December 2013 17:30 |
| Sign for my self | danilom | The Show Room | 6 | Fri 04 March 2011 04:50 |
| Hot Rod Shop Sign | woody | The Show Room | 4 | Fri 23 April 2010 12:14 |
| Edge lit sign | Jayson | The Show Room | 4 | Fri 20 March 2009 22:55 |