|
#271
 Fri 01 March 2013, 00:29
|
|||
|
|||
|
You could drive a truck with those
 Looks like it's coming together nicely. Looks like it's coming together nicely.
|
|
#272
Fri 01 March 2013, 15:10
|
|||
|
|||
|
Just got the Aspire 4 upgrade. Will try it out later tonight. The online tutorials seem that they have made some major upgrades and added some really cool features
|
|
#273
Sun 03 March 2013, 10:16
|
|||
|
|||
|
Only 24 days left until the promise ship date of the timing pulleys. Sometimes the waiting is the worst.

|
|
#274
Mon 04 March 2013, 14:17
|
|||
|
|||
|
Well to my surprise the timing pulleys arrived way ahead of schedule. I came home today to see them setting in the basement. 23 days ahead of promise date.
|
|
#275
Mon 04 March 2013, 14:19
|
|||
|
|||
|
|
|
#276
Mon 04 March 2013, 16:44
|
|||
|
|||
|
Now that I am ahead of schedule and totally unprepared, I just ordered the belts. Also ordered the rest of the pulleys and belts for my 4th axis. With any luck I will be assembling by the end of the week.
For those who are interested, the pulley was made by CMTCO in Massachusetts. The website is http://www.cmtco.com/ Last edited by pblackburn; Mon 04 March 2013 at 16:51..
|
|
#277
Tue 05 March 2013, 18:23
|
|||
|
|||
|
Machine is now dead in the water until belts arrive. Remove the other two steppers and will mount the 18 tooth timing pulley tomorrow. Received invoice today for belts from sdp-si. I need 24 hours for the 680 Loctite to cure properly for maximum strength. Have all shafts sized and one unit already assembled and waiting for the belt. Hopefully it will be get here by the weekend. Which will be nice since I have two jobs I need the accuracy for.
|
|
#278
Tue 05 March 2013, 22:08
|
|||
|
|||
|
Pete,
I find this quite interesting I found this same problem a few years back, and determined it to be backlash also, I went to 4 to 1 belt drives and eliminated the problem, I am curious to see how the 7 to one drives perform, I did the math on the gains but found that after 4 to 1 the gains were so minimal that I didn't think they were worth it , this may change my mind. thanks for sharing. //Chopper
|
|
#279
Wed 06 March 2013, 01:26
|
|||
|
|||
|
I would agree it is splitting hairs with the 4:1 and 7:1. The main reason was to save the money on the steppers and limit my loss of the gear motor purchase. The resolution only increases slightly at the 7:1 ratio. 7:1 is 0.0003" vs 4:1 is 0.0006". But with all things, the more precise the better. The only thing I hope for is a smoother run since the steppers have to turn faster. I have a 4:1 on the Z. The big thing I notice the backlash on is 3d modeling, lettering and photo carving. The photo carves I can not add as much contrast I as I would like because of the 0.011" backlash that is present in the gearbox design. Letting can cause a problem with the start and stop positions adding time to after cut clean up. The downside is the limits on the top end speed. But not one that I think I will notice.
|
|
#280
Wed 06 March 2013, 15:45
|
|||
|
|||
|
Pete,
I don't think you should have any speed loss since you were using the 7 to 1 gear drives, you will still have the same ratio, torque etc. so why would your motors have to turn faster? //chopper
|
|
#281
Wed 06 March 2013, 16:57
|
|||
|
|||
|
Chopper,
You are correct and I phrased the faster comment incorrectly, the steps per inch will be relatively close. The motor turning faster as it does on a 7.2:1 minimizes the resonance that is created. Even when making minute movements the faster spin minimizes the stepping (bump, bump, bump) vibration that you have with 4:1. I have always read about it but until I actually heard the difference when I installed the 4:1, the audible sound difference was incredible. Right from Oriental Motors website "Stepping motors at low speed produce a relatively high amount of vibration" Logically it adds up. The step per inch for the 4:1 is around 1700 and the steps per inch for the 7.2:1 is around 3100. It is night and day on the ears and even the feeling of the vibration in the spoilboard. With all 7.2 there was no vibration. Now I would not trade the 4:1 on my Z for anything as my cut quality increased exponentially but the resonance I could definitely do without. Is that a better explanation?
|
|
#282
Wed 06 March 2013, 19:26
|
|||
|
|||
|
Well I figured since the belts would be here tomorrow, I would get everything mounted on the machine. All plates fit nicely however I forgot to account for the manual release of the pinion. Have to machine out one place on each bottom plate. Will try to accomplish that tomorrow so I can get them assembled and post pictures of the assembly and mounted units.
|
|
#283
Wed 06 March 2013, 22:42
|
|||
|
|||
|
Quote:
it hasnt been much of an issue yet, looking forward to seeing your drives in action. //chopper
|
|
#284
Thu 07 March 2013, 18:58
|
|||
|
|||
|
All drives changed over, steps per inch set, ready to run. I will try to make a movie for you to hear the difference between the 4:1 and 7:1. Just as quiet as before. Some pictures for your viewing pleasure.
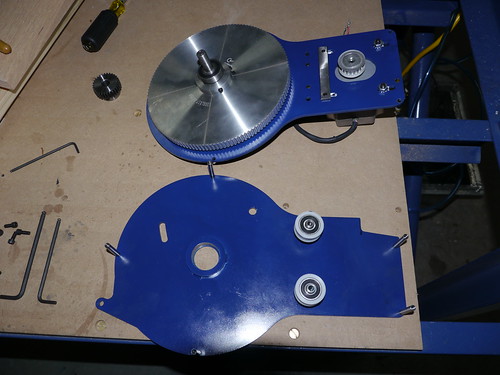 Before Assembly, on Flickr 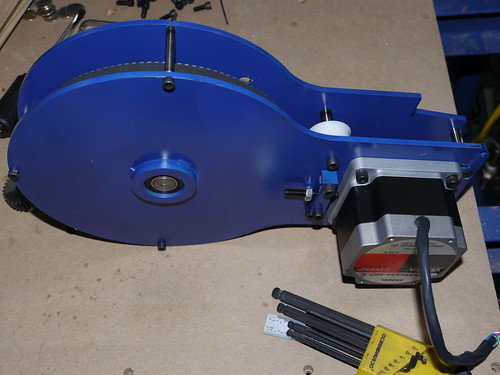 Side View Assembled, on Flickr 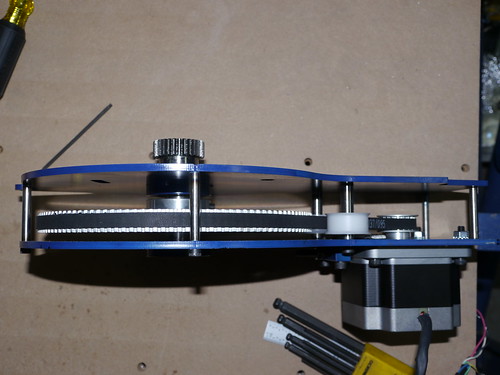 Top View Assembled, on Flickr 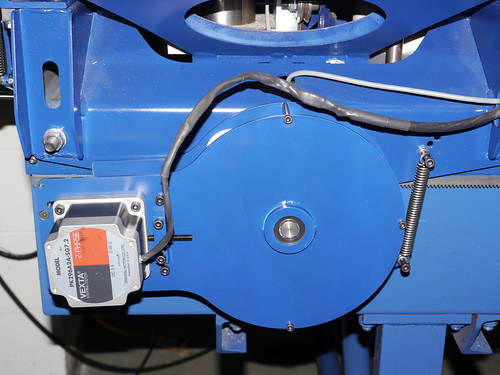 X axis on machine, on Flickr  Y axis on machine, on Flickr 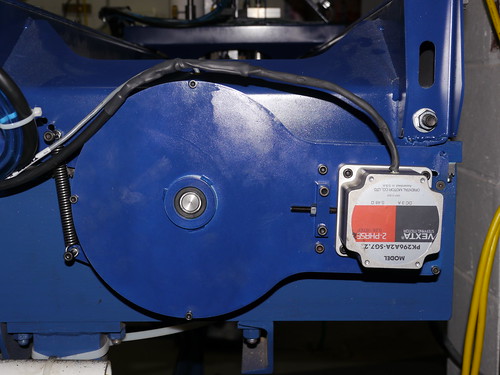 B axis on machine, on Flickr
|
|
#285
Fri 08 March 2013, 14:23
|
|||
|
|||
|
Spring project on the way. 4th Axis Start. Need more money!!!!! Don't we all. Still need tailstock. Most likely will use 80/20 1530 for the bed and 6824 linear bearings with brakes to hold the tailstock. Looking at a Sherline 3702 for the tailstock.
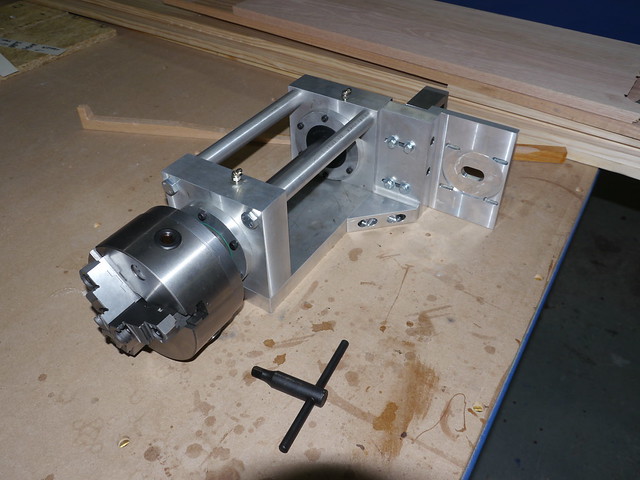 4th Axis, on Flickr
|
|
#286
Fri 08 March 2013, 17:31
|
|||
|
|||
|
Man, im loving your projet with 4th axis. I am at the very end of my assembly and cant wait to get my hands on this project also.
Keep us posted, and awsome work. Marko
|
|
#287
Fri 08 March 2013, 18:11
|
|||
|
|||
|
Marko, I always try to post what new things I am trying.
|
|
#288
Fri 08 March 2013, 18:16
|
|||
|
|||
|
Here is the video with a program running so you can hear the differences of the different reductions. It is uploaded in 1080 if you so choose. Sorry youtube does not provide a 1080p link only 720p so you will have to change it there. It is 3 minute worth so you can distinguish the drives. I gave a nice mention about Mechmate at the end.
720p youtube link here 360p youtube link here
|
|
#289
Sat 09 March 2013, 04:37
|
|||
|
|||
|
Pete - Thanks for that.
A great learning experience to see them in action, plus I just love things taken to the extreme  Regards Ross
|
|
#290
Sat 09 March 2013, 06:33
|
|||
|
|||
|
No problem
|
|
#291
Sat 09 March 2013, 20:20
|
|||
|
|||
|
Still cuts. One thing I did notice. When changing directions in cuts before there was a lot of vibration you could feel in the machine base, now it is almost not even noticeable. I was not expecting this. Here is a picture of another horse sign.
 First cut after upgrade, on Flickr
|
|
#292
Wed 13 March 2013, 16:43
|
|||
|
|||
|
Just some information.
Start of design for modification needed to crossbearers for mounting 4th axis. Looking at a max size of 12" (304.8mm) round capacity. It will have to span the length of X and require relocating the braces. I would like the capability to cut an 8 ft (2438.4mm) piece if I needed. This would require the both the A axis and tailstock to be beyond the spoilboard for maximum cut capacity. Option 2 is to have both inside the spoilboard area and limit the cut capacity to 5 ft (1524mm). Will make all the recess mounts prior to and based off a jig that has drill bushings in it. This jig will also be used to drill the existing crossbearers. It will have a 9" (228.6mm) support on each side to bolt onto the existing crossbearers to keep the alignment. Welding would cause draw and shift the existing alignment of the crossbearers so I am electing to stay with my current bolt together design. The A axis is built using aluminum and tapered bearings. The 6" chuck when we faced and mounted the chuck was within 0.0005" run out. This is more than accurate enough for wood I believe. I know I will have to use the machine and indicator to make sure I have the bed lined up properly when installing it. Right now I am working on some other signs and getting ready to start cutting the kitchen cabinets. That is the only reason I built this machine was for the cabinets. Funny how things change.
|
|
#293
Fri 15 March 2013, 15:15
|
|||
|
|||
|
Let me just say it sucks when someone hacks your email account. Eight hours of changing and update emails and passwords on websites. Vectric was easy to work with on the problem.
|
|
#294
Sun 17 March 2013, 11:56
|
|||
|
|||
|
Pete sorry to hear about the hacking of your email account
On another note it has been a joy to follow you on your build. Very exciting and informative and Im sure we all appreciate it.
|
|
#295
Sun 17 March 2013, 16:16
|
|||
|
|||
|
James,
Thanks for the concern and I do try to post my progress. Seems like most guys here do this for a living whereas I do this for a hobby. I like to post the great things I have done as well as the dumb things that outnumber them. Until someone shuts me down I will continue to display my progress. One of the things I have learned is information is hard to get on most things. Here at mechmate.com this is not so prevalent. A lot of people are really good at what they do but do not like to share while others do not have a clue and like to lead other in the wrong direction because they like to post a lot. Some newbies are very discouraged because of this. I have always said there is no right way but many ways to get to the end solution. A smart person would listen to all of them, debate them and form a solution based upon all the relevant information.
|
|
#296
Sun 17 March 2013, 16:28
|
|||
|
|||
|
Update
Was cutting out a larger project and ran into the problem with the steppers all of a sudden losing massive steps again when in rapid to tool change (more than 3"). I have had this happen before and found the solution then was to output single toolpaths. Thought I would try to get to the bottom of this time. The only thing I found that cleared it was to move my velocity down to 400 and set acceleration to 40 on all axes. I have no idea why worked but it did. Have posted a mach's forum searching for answers. Had to modify the layout of the sign to accommodate. Thank God I was there when it messed up or I would be out $60 in wood.
|
|
#297
Mon 18 March 2013, 02:54
|
|||
|
|||
|
Physics always has an answer
Sir Isaac Newton said, Force=ma, m is mass & a is acceleration. Since mass is constant, When you set your acceleration more than the motor can provide, you will loss steps. Power =WT, W is angular speed, T is torque, When you set your speed too high & your motor can only provide that much torque, hence you loose steps.
|
|
#298
Mon 18 March 2013, 06:09
|
|||
|
|||
|
Ken,
So why when the velocity was lower and the acceleration was lower I still lost steps? The version of Mach I have did have a bug with when Z was set different than X and Y it would have problems. I need to upgrade to further test. Before when all axes where the same I did not notice this. This first occurred when I changed the Z drive over to belt drive and the velocity and acceleration was different than X and Y. Before the change, I was 500 and 50, after that I changed the motor tuning. Since it appeared to be X and Y I lowered the acceleration on X and Y to 25. It stopped for a while but when there was a lot of rapids I found this reappearing. I then set all axes to 400 on velocity and it still did it. So I set all axes acceleration to 40 and now it has stopped. So I lowered V and increased A.
|
|
#299
Mon 18 March 2013, 20:46
|
|||
|
|||
|
If its still loosing step, it is either you didn't set your acceleration low enough or you didn't get enough torque to overcome the total summation of external forces which you need to overcome. OR, you have too much external forces which you don't want acting on your motor, they can be generated from anything. such as stiction, friction, overweight due to extra super feature which you add on the car... misalignment... etc etc.etc...
IMHO, if Mach has a bug, everyone would had caught it, it won't be exclusive to you... Mind you, the belt reduction box do contribute to the total mass which your y motor has to overcome. BTW, "If there is a lot of rapid,..." this is the sure way to see loose steps when the motor is just barely making enough torque/power to keep up with your machanism combo. SO, lower the rapid speed & acceleration further. Another way to improve speed/torque is to raise your PSU voltage. but without the measured motor characteristic curve, its not always gonna work. IMHO, if you must run "rapid" in lightning speed, go back to basics, strip off all unnecessary weight from the car & see what happens. Last edited by KenC; Mon 18 March 2013 at 20:54..
|
|
#300
Mon 18 March 2013, 21:23
|
|||
|
|||
|
I read your posts on the Mach3 forum and the discussion there is far from conclusive.
If you suspect a bug then it would always be best to include a build number. You have converted small steppers to do the job and I believe that you are now seeing limits to your design. The issue is that as the stepper motor RPM increases the torque rapidly falls off. The 7:1 belt reductions cause the motors to spin even faster for the rapids putting them into their lowest torque on the motors overall torque curve. Given the substitution for smaller motors over the perferred ungeared 34HS9801's and the increase in the belt reduction ratio you have received a double hit. The solution will be to slow the rapids down to a point where the motor RPM can cope with the weight it is asked to push around. My opinion but of course others may have their own and hey I might even be wrong .Ross
|
 |
|
|
 Similar Threads
|
||||
| Thread | Thread Starter | Forum | Replies | Last Post |
| Parts arrived !!! Time to get to work !! - Pennsylvania USA | Rapid | Introduce yourself and start planning | 51 | Fri 06 June 2014 07:53 |
| Newbe here - Pennsylvania, USA | Dave | Introduce yourself and start planning | 19 | Wed 11 December 2013 17:30 |
| Sign for my self | danilom | The Show Room | 6 | Fri 04 March 2011 04:50 |
| Hot Rod Shop Sign | woody | The Show Room | 4 | Fri 23 April 2010 12:14 |
| Edge lit sign | Jayson | The Show Room | 4 | Fri 20 March 2009 22:55 |


