|
#331
 Mon 29 July 2013, 16:50
|
|||
|
|||
|
very nice
nice!

|
|
#332
Mon 29 July 2013, 17:11
|
|||
|
|||
|
If you push the right buttons, do you get money out the slot at the bottom?
 Nice looking console, must be quite sturdy?
|
|
#333
Mon 29 July 2013, 19:18
|
|||
|
|||
|
It is very sturdy. Probably weighs a tad under 200 lbs. The slot was for a printer that had been removed already.
Hopefully I'll figure out how to press the buttons in a manner that starts to generate Dollars.
|
|
#334
Thu 01 August 2013, 14:08
|
|||
|
|||
|
How it looks today.

|
|
#335
Thu 01 August 2013, 18:17
|
|||
|
|||
|
Looks...cool

|
|
#336
Thu 01 August 2013, 19:46
|
|||
|
|||
|
Looks sorta like an ATM, does it spit out money?
|
|
#337
Fri 02 August 2013, 06:16
|
|||
|
|||
|
I wish it spit out money.
On a related note, I finally drew up and toolpathed the end caps for a piece of 12" schedule 40 PVC pipe, so I can replace the collapsed bucket filter housing on my vac table...
|
|
#338
Sun 04 August 2013, 17:19
|
|||
|
|||
|
New filter housing done and installed.
Control cabinet painted and permanemtly hooked up. ( I KNEW I wouldn'y be able to leave it grey. )Now, I'd like to add a "black button" on my y-car to run the M889.m1s (Simple Auto Zero) Macro with the 2010 screenset i'm using. The more I read, the more confused I become. Can anyone point me in the right direction?
|
|
#339
Sun 04 August 2013, 19:30
|
|||
|
|||
|
What is it that you don't understand?
I can't remember everything off my head, but there are plenty of tutorials video & texts once you google. Generally, 1)You need to mod the screen set with screen set editor so that you can create the "black button" on screen, find its number. Google for video tutorial & look up the manuals. 2)open M889.m1s file & start pulling your hair until you get everything working they way you want.
|
|
#340
Sun 04 August 2013, 21:22
|
|||
|
|||
|
Darren. As far as I understand we need something to trigger the macro once the button has been pressed. I bought the MadMach plugin to try this but haven't got any further than that. Once I do something with I will come back here but that may give you a starting point.
Cheers Bruce Last edited by racedirector; Sun 04 August 2013 at 21:23.. Reason: spelling fixup
|
|
#341
Mon 05 August 2013, 01:11
|
|||
|
|||
|
Sorry matey, its called Mach MAD - http://www.cnczone.com/forums/mach_s...tics_plug.html
I got mine from Peter Homann @ Homann Designs.
|
|
#342
Mon 05 August 2013, 15:11
|
|||
|
|||
|
I'll look into MachMad.
A couple pics of the completed console. I REALLY like it. 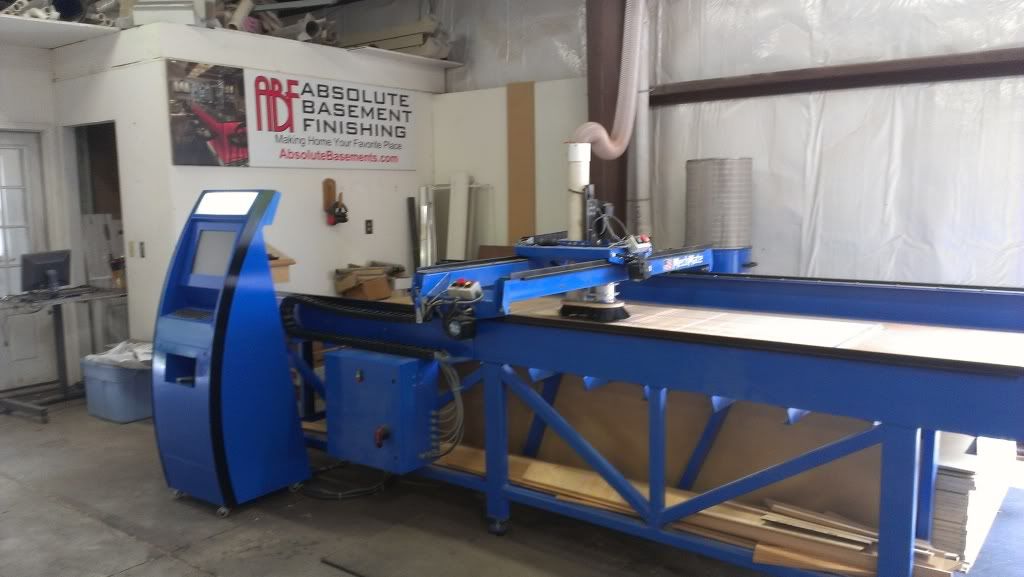 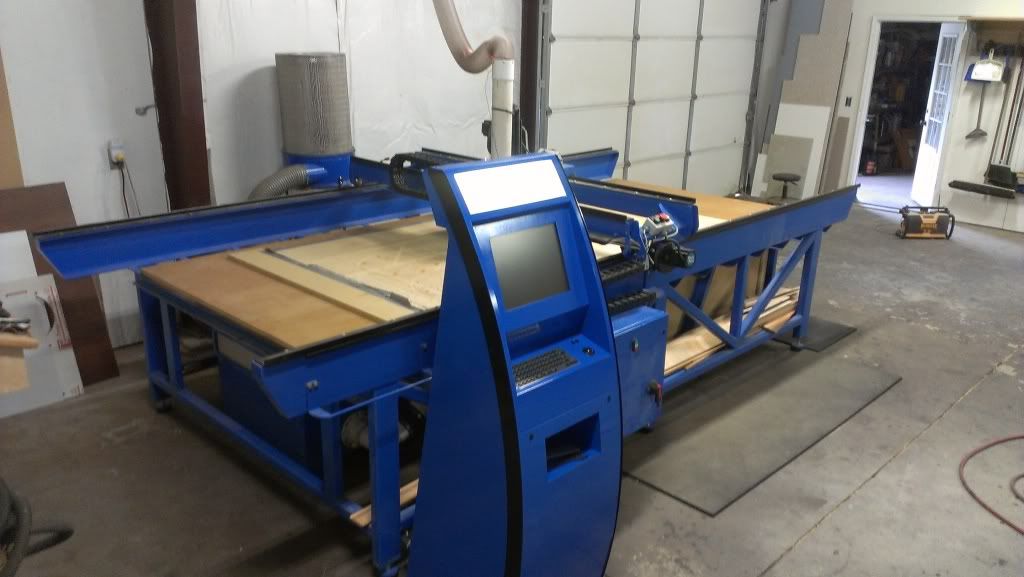
|
|
#343
Mon 05 August 2013, 15:32
|
|||
|
|||
|
Very nice! all you need now are some logo's on that backlit panel.
|
|
#344
Mon 05 August 2013, 15:55
|
|||
|
|||
|
nice.... can you take some shots of the boards under the machine? i have something like that but i have to rebuild it.
and please please some info about the vacuum system you made. how is working. motors. plenum. spoil board you have on the plenum. tnks.
|
|
#345
Mon 05 August 2013, 16:02
|
|||
|
|||
|
inspiring....

|
|
#346
Mon 05 August 2013, 16:44
|
|||
|
|||
|
Fernando, this is the only picture I can find of my table.
There is a 4" hole bored in the bed under the sheet with the duct tape on it. The duct taped board is a sheet of 3/4" Trupan MDF with a grid machined on the underside, 3/8" deep, leaving 1" squares intact throughout. The top board is a sheet of 3/4" UV plywood I'm cutting cabinet parts out of. 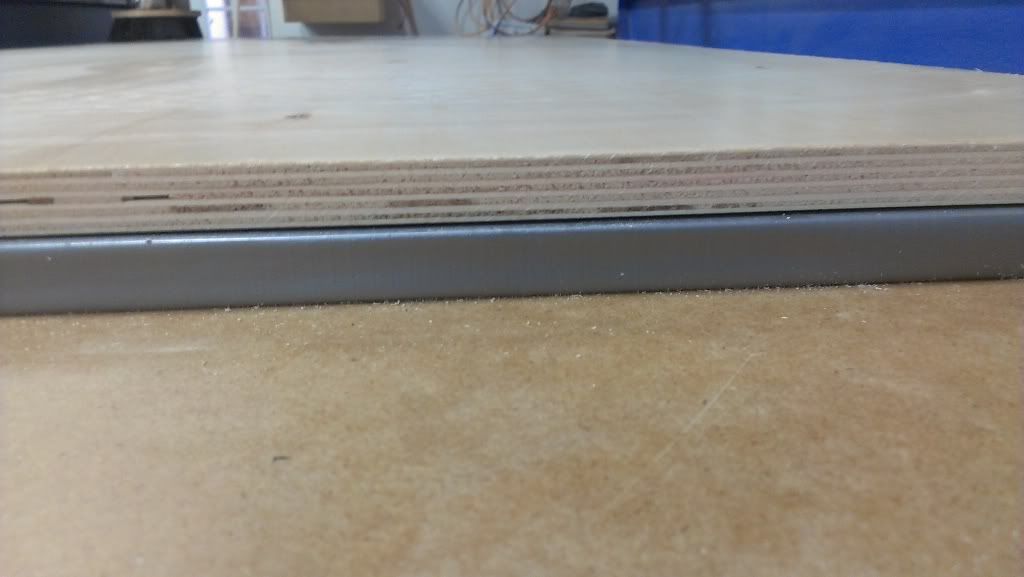
|
|
#347
Mon 05 August 2013, 16:55
|
|||
|
|||
|
A quick video of the vacuum pulling through the Trupan and taking a 1/4" warp out of a piece of 3/4" UV plywood along the 48" width.
I didn't have to touch the plywood after squaring it to the table. http://youtu.be/CmhAfNMhyPs Last edited by darren salyer; Mon 05 August 2013 at 16:59..
|
|
#348
Mon 05 August 2013, 17:25
|
|||
|
|||
|
Alan, I'm thinking my company logo on the backlit panel...
|
|
#349
Mon 05 August 2013, 20:16
|
|||
|
|||
|
Finished filter housing.
Bigger than it needed to be, but I used what I had laying around. I have assembly pics if anyone is interested. 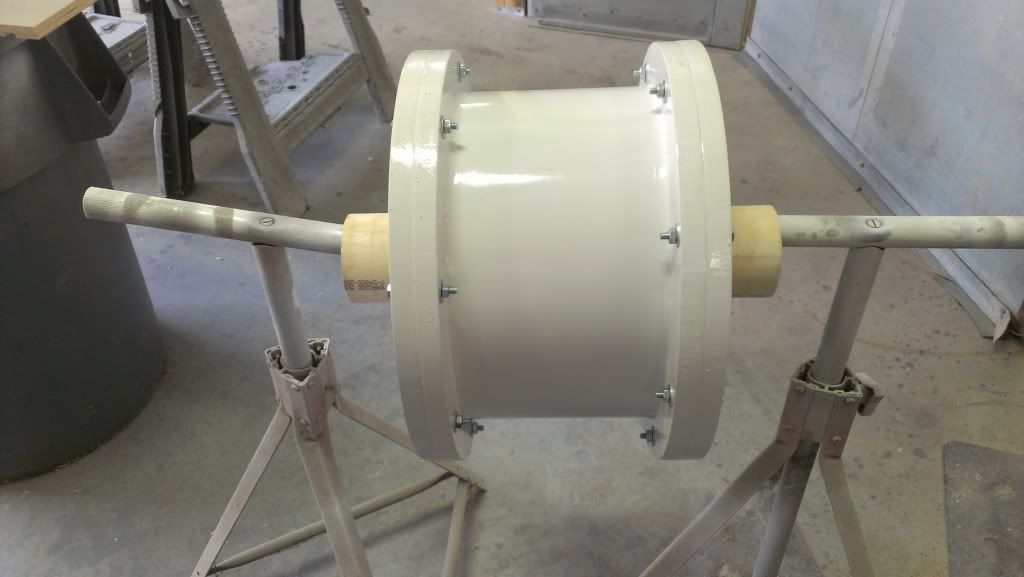
|
|
#350
Tue 06 August 2013, 00:07
|
|||
|
|||
|
Company logo would certainly "Personalize" the machine, and of course we want to see assembly pics.
|
|
#351
Tue 06 August 2013, 05:48
|
|||
|
|||
|
before paint....

|
|
#352
Tue 06 August 2013, 05:50
|
|||
|
|||
|
Used a 4" toilet flange, and made a flange to hold a 97 Mustang air filter against it, only because I had one on the shelf from a car I sold. Worked well because it has a foam gasket that was captured by the two flanges perfectly.
 The filter is distorted because it was inside the one that was made from a bucket and crushed at the first use. As an aside, I blew a lot more dust out of it than I thought it would have in it. My main purpose was to protect the vacuum impellers from debris dropped in an open port when replacing the bleeder, but it seems to be filtering dust as well. Last edited by darren salyer; Tue 06 August 2013 at 05:53..
|
|
#353
Tue 06 August 2013, 05:56
|
|||
|
|||
|
By making this the side plumbed to the vac source, if any nuts come loose, they will lay in the housing instead of being ingested by the impellers.
Easier to blow dust off the outside of the pleats as well. 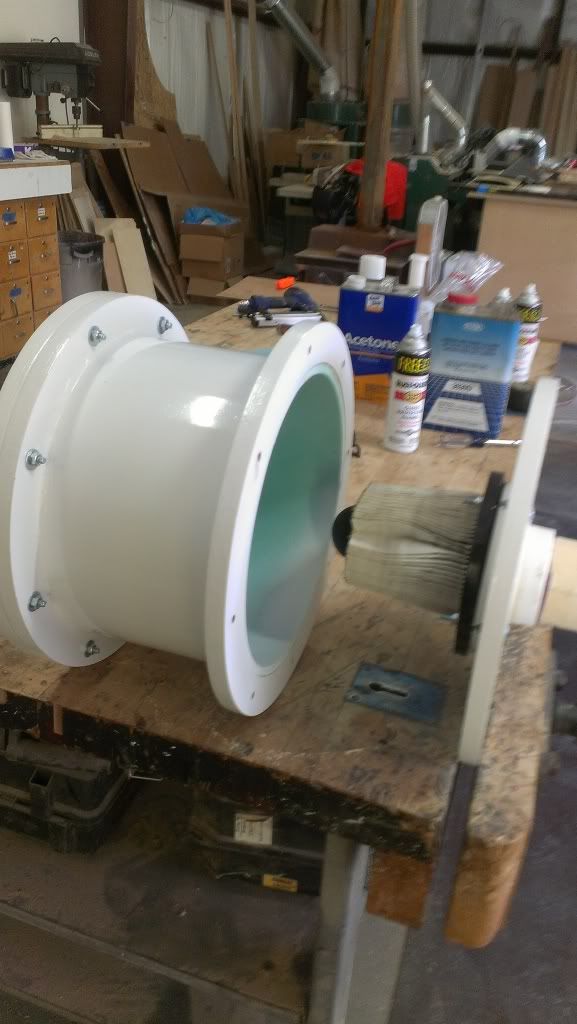
|
|
#354
Tue 06 August 2013, 21:40
|
|||
|
|||
|
I wonder if a dust extracting cyclone would hold up? Was just thinking one of those then your filter housing with a shop vac foam filter would let more air flow. The cyclone would get the bigger chips out, the foam would catch anything that would actually hurt the impeller. After seeing it collaps a bucket though, maybe not.
|
|
#355
Wed 07 August 2013, 01:25
|
|||
|
|||
|
I won't stop anyone from having fun building stuff
IMHO it is not mandatory to have a filter before the fan in this application. the mdf works better than any filter & the vacuum fan can handle a few flakes of wood shaving occasionally. Even Ward Bartsch of Lighthouse Enterprises said so. but having one won't hurt any one except some pressure will be lost. I put in a T-trap contraction similar to those fitted under the kitchen sink to catch the occasional bolts & nuts which may get into the vacuum duct. Just use a T-joint same size with the vacuum duct/pipe with top end connect to the plenum, blank the bottom end (in any means you like) & the horizontal end is connected to the vacuum pipe which will eventually end up at the vacuum fan.
|
|
#356
Wed 07 August 2013, 06:04
|
|||
|
|||
|
Definitely not mandatory to have a filter. Like you, I think the MDF acts as an even better filter than the paper one I'm using. My concern was having a large chunk fall unnoticed into the open 4" hole in my table while changing bleeder boards or something similar.
A cheap insurance policy if you will, hence my disinterest in spending any money on it, save $3.00 worth of bolts. Nevermind that puttering around on a simple project on a weekend is priceless as a form of relaxation.
|
|
#357
Mon 12 August 2013, 15:40
|
|||
|
|||
|
I got a windfall in the form of about 1500 lbs. of Corian scrap from my countertop supplier, and I cut a few of these out and took them to the County Fair.
Sized to hold six 16 oz. Beer cups, I'm still getting calls from people who would like one..... To date, I've sold 38 at 25 bucks a pop. 
|
|
#358
Mon 12 August 2013, 16:23
|
|||
|
|||
|
Darren,
Nice idea.
|
|
#359
Thu 15 August 2013, 19:12
|
|||
|
|||
|
Let me get my gear.......lol.
I drew this in Aspire and cut it out of a half sheet of 2" foam I had laying around. I live in Josephville Mo, hence the wording. I'll rust finish it and hang it on the shop wall as a conversation starter. It's 46" diameter and took about 2.5 hrs. total. This pic is before I blew all the foam bits off of it. 
|
|
#360
Thu 15 August 2013, 19:17
|
|||
|
|||
|
Shop wall....heck, around the world
Nice
|
 |
|
|
 Similar Threads
|
||||
| Thread | Thread Starter | Forum | Replies | Last Post |
| University Of Missouri Saint Louis Theater | ganderson | Introduce yourself and start planning | 8 | Fri 31 October 2014 17:53 |
| Starting my MM Build - St Louis MO USA | inventek2000 | Construction started, but not cutting yet | 38 | Sun 25 September 2011 17:51 |
| my machine cnc | marcoscnc29 | Archives | 1 | Sat 24 April 2010 17:58 |


