|
#241
 Fri 04 October 2013, 13:44
|
|||
|
|||
|
Tom, they will solder fine. Just trim the end down to 18g with your stripper only long enough insert into the cup. Make sure it is inserted so the rim of the full surface touches the end of the cup. Solder with quality 60/40 electronics solder. It is your choice to use shrink tube or liquid electrical tape.

|
|
#242
Fri 04 October 2013, 13:45
|
|||
|
|||
|
The connectors are not the best of quality but they can be worked with.
|
|
#243
Fri 04 October 2013, 14:31
|
|||
|
|||
|
Pete the problem is that the wire diameter is larger than the cup, bigger than the whole pin itself. I'll look for a better connector.
|
|
#244
Fri 04 October 2013, 18:10
|
|||
|
|||
|
I understand that, if you use your wire strippers they will decrease the circular mills of the 14g to 18g. Strip off only enough copper to allow to slide into the cup but bottom out against the 14g copper to the back side of the cup then solder. This way you have full contact.
If you want a different connector, Amphenol makes good connectors.
|
|
#245
Fri 04 October 2013, 20:05
|
|||
|
|||
|
I can do that and thought about doing that before but didn't think of it as a good practice IMHO. But after doing research and looking around for a connector that is large enough I find it is not possible. The largest cup diameter I found was 0.9 mm. Still requiring trimming the wire back a bit. Oh well, go with what works.
|
|
#246
Sat 05 October 2013, 02:09
|
|||
|
|||
|
Please Advise
I was thinking and that is why I ask your advise.
Please review this solution to the issue.  Use appropriate size pin connector grind pin shaft to fit solder cup. double crimp pin connector to wire. solder pin connector to other connector slide heat shrink over assembly and apply heat. repeat until done. pray before using...update insurance
|
|
#247
Sat 05 October 2013, 04:14
|
|||
|
|||
|
Mike, I don't see how that can be done and still slide the connector cover/shield over it and be safe. The shield is what hopefully prevents wires from getting ripped out. I think Pete's approach is much better, just trim back the wire from 14g to 18g at the depth of the cup, insert and solder.
The connector that came with mine is a real cheapo and the pins aren't even firmly inserted, I'm definitely getting a replacement.
|
|
#248
Sat 05 October 2013, 04:15
|
|||
|
|||
|
Insurance usually doesn't cover negligence.
|
|
#249
Sat 05 October 2013, 11:30
|
|||
|
|||
|
You will be drawing 9 amps max, 18g is good for 5A. You will run around 2 to 6 amps with 2-3 being most of the time if your chip load is correct. Your area of coverage with the solder fills the gap of the minute amount of lose of copper. Your circular area is still the same after soldering. Your wire is only rated for 90°C before failure, solder melts at minimum of 190°C. The spindle connector that came for mine was for 16g wire. I purchased my spindle from UgraCNC.com. Contact them and see if they have a connector that will work if your connector solder cup is smaller than the gauge of your wire. They respond really fast, even on a Saturday.
|
|
#250
Sat 05 October 2013, 11:32
|
|||
|
|||
|
Tom, reading post 248 it sound like you have a connector the was smaller than mine. I only have to modify the gland nut to accommodate the larger cable. Sounds like you will have to purchase a different connector.
|
|
#251
Sat 05 October 2013, 11:33
|
|||
|
|||
|
|
|
#252
Sat 05 October 2013, 11:34
|
|||
|
|||
|
I hope this helps.
|
|
#253
Sat 05 October 2013, 12:17
|
|||
|
|||
|
Thanks Pete I'll give'm a call.
|
|
#254
Sat 05 October 2013, 14:10
|
|||
|
|||
|
Hurshy, updating insurance wouldn't do anything with a motor that is not UL listed. Insurance companies can be ignorant when it comes to that.
|
|
#255
Sat 05 October 2013, 22:11
|
|||
|
|||
|
Cable Diameter is .637
The circumference of the cable is 2". So Diameter = .637.
This is a well built cable with thick Poly Olefan jacket, braided wire and Aluminum foil wrapped. Each of the 3 power conducting wires also has a heavy insulator. What ever connector you get will need to pass that .637 cable. Here is what I found on CNC Zone. Check site, I hope it's good because it is what I ordered. I do like the fact that it has the ground added. http://www.cnczone.com/forums/bencht...e_company.html Digi-Key part numbers for Amphenol Connectors 361-1345-ND CONN MALE PLUG 3+PE SILVER BLACK3 (black plug) 11.29 361-1344-ND CONN MALE PLUG 3+PE SILVER BLUE3 (blue plug) 11.32 361-1081-ND CONN FMLE RCPT 3+PE SCREW SILVR6 (black receptical) 9.09   
|
|
#256
Sun 06 October 2013, 05:30
|
|||
|
|||
|
Now that's what I'm talking about! I looked the parts carefully, they're good to up to 14 awg and tight enclosure too. I ordered the blue one (of coarse) and the female receptacle, already on their way. Great find Mike!
|
|
#257
Sun 06 October 2013, 06:40
|
|||
|
|||
|
Well done Hurshy.
|
|
#258
Sun 20 October 2013, 12:02
|
|||
|
|||
|
I will put this here for future reference. Allied Electronics has the Amphenol Tuchel C016 20D003 100 10 for less than $8 and the Amphenol Tuchel C016 20C003 100 12 for about $7. Both have a 16A rating. Hopefully this will help someone in the future. Also listed above it states male plug and female receptacle. It should be a female connector and male panel receptacle. You never want your live conductors to be exposed which they will be since the hot wire is connecting to the motor. The motor is the dead end and should have the male pins not the female (socket). If it is disconnected and the power is applied there is the possibility for a unintended touch which creates an electrocution hazard. Not a good work or safety practice.
|
|
#259
Sun 20 October 2013, 16:26
|
|||
|
|||
|
Pete you are right again, I didn't catch that little detail. Too late now, already installed the other and I'm not going to take steps backwards right now, I'll replace later, I want to get the the table turned over and ready for further assembly.
|
|
#260
Sun 20 October 2013, 21:52
|
|||
|
|||
|
Digi-Key is not the Cheapest
Yep!, this little episode taught me that Digi-Key is my last choice, places like Allied and a few others are a better deal.
|
|
#261
Sun 20 October 2013, 22:10
|
|||
|
|||
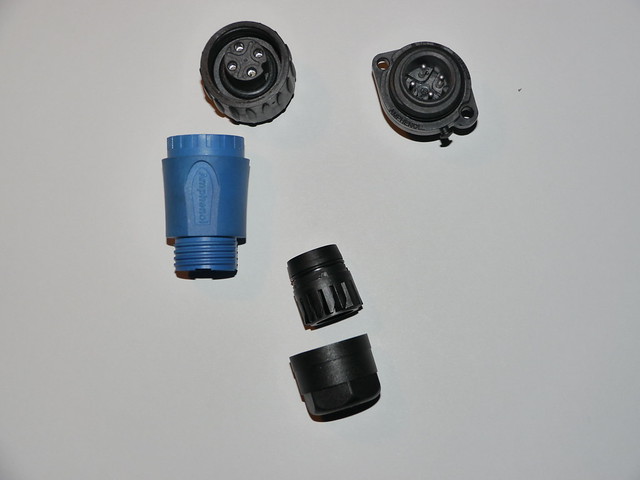 Amphenol Tuchel Assembly, on Flickr This picture references the post above. I have posted this here for future builders. There are more pictures of this connector located here
|
|
#262
Mon 21 October 2013, 02:57
|
|||
|
|||
|
I may not have gotten the orientation right but I got the color right anyway...

|
|
#263
Mon 21 October 2013, 20:22
|
|||
|
|||
|
Removal of Spindle Top
Tom after you removed the 4 allen screws from the top of the spindle, how did you remove the cap? I have tapped it a few times but do not want to over do it. Is it time for the rubber mallet?
|
|
#264
Mon 21 October 2013, 20:36
|
|||
|
|||
|
Mine had a sealant of sorts on it, but not much and came apart easily. The cap is fairly thick cast aluminum. It had no lip, recess or anything, it just mated two flat surfaces and two o-rings. I would try wood or plastic mallet, but not hard. If you had to pry it open I would try opposite of the water line side (o-ring seats underneath) with very thin putty knife, very gently with the thought of a possible lip/seat being there. Good luck.
|
|
#265
Wed 30 October 2013, 19:43
|
|||
|
|||
|
Well, yesterday my son and I started back on the monster, moved a lot of stuff around i the shop to barely make enough space to lay the table down (upside down). Tonight we positioned the table on the leg frames to make sure all was well (it is) Tomorrow night I'll start welding the cross members and hopefully won't run out of gas in the middle of it. I'm following in Darren Salyer's foot steps and bought a HF dust collector and I'll paint it blue like he did too (and send Darren his royalty fees
 ) I'll take a few pics tomorrow and post. Backs a bit sore. ) I'll take a few pics tomorrow and post. Backs a bit sore.
|
|
#266
Thu 31 October 2013, 06:32
|
|||
|
|||
|
Without pics, it never happened.....
|
|
#267
Thu 31 October 2013, 14:54
|
|||
|
|||
|
Nothing wrong with Harbor Freight other than it is not meant for hard usage. Most people say their dust collectors only need the blade balanced a little and they run fine. The motors are not be best quality but it should serve you well. A descent motor purchase later will still be less than buying a Jet or equivalent manufacturer.
|
|
#268
Thu 31 October 2013, 16:53
|
|||
|
|||
|
Hey on sale for $199 plus 20% off, net $159
 . It'll be fine for a while at least. If I tear it up, oh well. I've been looking on auctions for decent dc's with large fans (so I can make a cyclone) but got tired of waiting for one within 200 miles. Darren, true in many respects, just don't tell the wife's private investigator. Ha Ha. . It'll be fine for a while at least. If I tear it up, oh well. I've been looking on auctions for decent dc's with large fans (so I can make a cyclone) but got tired of waiting for one within 200 miles. Darren, true in many respects, just don't tell the wife's private investigator. Ha Ha.
|
|
#269
Thu 31 October 2013, 17:45
|
|||
|
|||
|
LOL. Agreed. My HF collector has several hundred hours on it. From what I've read, the switch is the weak point. When mine failed, I wired it direct and plugged it into a RF controlled outlet.
|
|
#270
Thu 31 October 2013, 17:46
|
|||
|
|||
|
Do a Thein baffle and add a Cartridge filter, and it works really well.
|
 |
|
|
 Similar Threads
|
||||
| Thread | Thread Starter | Forum | Replies | Last Post |
| Cutting sign vinyl with your MM | smreish | Cutting various materials - bit selection, feeds, speeds | 5 | Thu 17 March 2016 03:33 |
| Problems working the end of some Ballscrews | coinhunter | Miscellaneous / General / Whatever / Catchall | 5 | Thu 21 July 2011 14:06 |
| Working Out The Table Plan | dakmonf | Introduce yourself and start planning | 32 | Wed 30 June 2010 11:59 |
| Power Contactor Not Working | Regnar | Troubleshooting | 28 | Sat 10 April 2010 12:38 |
| Vinyl Cutting with MM - Drag knife attachment for router | Kobus_Joubert | 50. Toolheads | 17 | Thu 04 June 2009 01:27 |


